

Location services on a MacBook can be incredibly useful for a variety of reasons. Whether you want to find nearby restaurants, navigate using maps, or receive location-specific notifications, having your location information enabled can enhance your overall user experience. In this article, we will guide you through the process of turning on location services on your MacBook. Additionally, we will explore how to turn off location services and introduce you to a powerful tool called iFoneTool AnyGo, which allows you to change your location on your MacBook.
Why Would You Turn On Location on MacBook?

Before we delve into the steps of enabling location services on your MacBook, let’s briefly discuss why you might want to do so. Here are a few reasons:
- Maps and Navigation: With location services enabled, you can use the Maps app on your MacBook to get accurate directions, find nearby points of interest, and estimate travel times. This can be incredibly useful when you’re exploring a new city or trying to navigate unfamiliar areas.
- Geotagged Photos: Enabling location services allows you to capture the location information of the photos you take with your MacBook’s camera. This feature, known as geotagging, can be helpful in organizing and remembering where your photos were taken. It adds a geographical context to your photo collection.
- Location-Specific Notifications: Certain apps, such as weather, travel, or restaurant recommendation apps, utilize your location to provide you with location-specific information or alerts. For example, you might receive weather updates tailored to your current location or recommendations for nearby restaurants or attractions.
- Find My Mac: In the unfortunate event that your MacBook gets lost or stolen, having location services enabled can be crucial. The “Find My” feature, available on macOS, allows you to track the whereabouts of your MacBook using its location information. This can aid in recovering your lost or stolen device or provide valuable information to law enforcement.
- Enhanced App Functionality: Some applications require access to your location to deliver their full range of features and functionality. For instance, fitness or health-tracking apps might use your location to provide accurate data about your outdoor activities, while ride-sharing apps need your location to connect you with drivers in your area.
How to Turn On Location on MacBook?
Now, let’s walk through the step-by-step process of turning on location services on your MacBook:
- Go to the Apple menu: Click on the Apple icon located in the top-left corner of your screen.
- Open System Preferences: From the drop-down menu, select “System Preferences.”
- Locate Security & Privacy: In the System Preferences window, click on the “Security & Privacy” icon.
- Click on the Privacy tab: Within the Security & Privacy window, navigate to the Privacy tab.
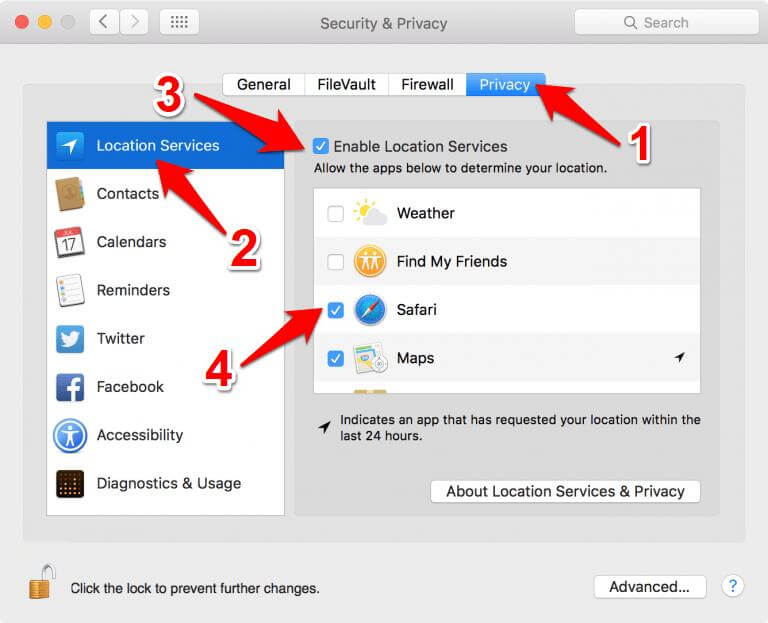
- Enable Location Services: On the left side of the Privacy tab, you will see a list of different privacy settings. Select “Location Services” from the list.
- Unlock the settings: In the bottom-left corner, you might see a padlock icon. If it is locked, click on it and enter your administrator password to unlock the settings.
- Enable Location Services: Once the settings are unlocked, check the box next to “Enable Location Services” to turn on location services for your MacBook.
- Adjust App Permissions: Scroll through the list of apps on the right side of the window. You can individually allow or deny access to your location information for each app listed.
- Customize Location Services: At the bottom of the Privacy tab, you have the option to customize location services further. You can choose to enable the precise location or limit it to the approximate location based on your preference.
- Close System Preferences: Once you have adjusted the settings to your liking, close the System Preferences window.
How to Turn Off Location on MacBook?
If you ever wish to disable location services on your MacBook, follow these steps:
- Go to the Apple menu: Click on the Apple icon located in the top-left corner of your screen.
- Open System Preferences: Select “System Preferences” from the drop-down menu.
- Access Security & Privacy: In the System Preferences window, click on the “Security & Privacy” icon.
- Navigate to the Privacy tab: Within the Security & Privacy window, go to the Privacy tab.
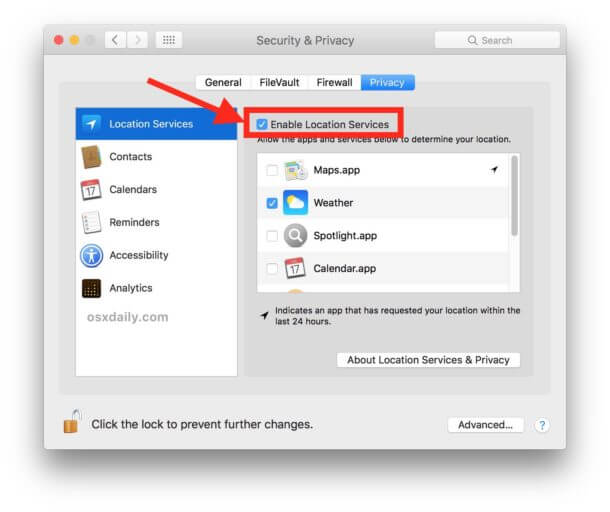
- Disable Location Services: On the left side of the Privacy tab, select “Location Services” from the list.
- Unlock the settings: If the padlock icon in the bottom-left corner is locked, click on it and enter your administrator password to unlock the settings.
- Turn off Location Services: Uncheck the box next to “Enable Location Services” to disable location services on your MacBook.
- Close System Preferences: Once you have made the changes, close the System Preferences window.
The Best Tool to Change Your Location on MacBook
While the built-in location services on your MacBook serve various purposes, you might find the need to change your location for specific applications or privacy reasons. In such cases, iFoneTool AnyGo is a powerful tool that allows you to easily change your location on your MacBook.
Key Features
- Simulate GPS Movement:
With iFoneTool AnyGo, you can simulate GPS movement on your iOS device. This means you can virtually move your device to any desired location around the world without physically being there. It allows you to explore different locations and test location-based apps or services without leaving your current place.
- One-Click Location Spoofing:
The tool provides a user-friendly interface that allows you to change your location with just a few clicks. You can easily select a specific location on the map or enter the coordinates of the location you want to spoof. iFoneTool AnyGo then instantly applies the new location to your iOS device.
- Route Simulation:
In addition to single-point location spoofing, iFoneTool AnyGo lets you simulate routes. You can choose a starting point and an endpoint, and the tool will generate a route between them, complete with simulated movement along the path. This feature is useful for testing location-based apps that rely on continuous movement, such as fitness or navigation apps.
- Multiple Location Modes:
iFoneTool AnyGo offers various location modes to suit different needs. These modes include the “Teleport” mode for instantly changing your location, the “Two-Spot” mode for simulating movement between two specific locations, and the “Multi-Spot” mode for creating a customized route with multiple waypoints. These modes provide flexibility in simulating different location scenarios.
- Real-Time Location Display:
The tool provides a real-time display of your device’s location on the map. This allows you to visualize and verify the location changes you make. You can see the updated location coordinates, address, and other relevant information on the screen.
How to Use iFoneTool AnyGo?
Step 1: Download and install the iFoneTool AnyGo on your computer. Open AnyGo and click the Start button.

Step 2: Connect your phone to your computer by USB, and then you will see your location on the map.

Step 3: Click the location you want to go on the map or enter where you’d like to go on the top left. And then click “Move”.

Conclusion
Enabling location services on your MacBook can significantly enhance your user experience by providing access to maps, geotagged photos, location-specific notifications, and the Find My Mac feature. By following the simple steps outlined in this article, you can easily turn on location services and customize the app permissions according to your preferences.
Additionally, if you ever need to change your location for specific purposes, iFoneTool AnyGo is an excellent tool that allows you to simulate different locations on your MacBook. With these instructions at your disposal, you can make the most of location services on your MacBook and enjoy the benefits they offer.